
Car Camping and Road Tripping
- Lauren Nobles
- Aug 17, 2024
- 10 min read


Is tent camping too much hassle? Is staying in hotels out of your price range? Do you want to wake up in some of the most peaceful places with incredible views? Then maybe car camping might be you. I spent three weeks living in my car on a road trip traveling through states to different national parks and I want to share my experience and lessons learned. If you're considering a road trip adventure and thinking, "How hard can it be?"—you’re in the right place. Spoiler alert: It’s not just about tossing a sleeping bag in the backseat and hitting the gas. Let’s dive into cooking, staying clean, doing laundry, and keeping everything (including your sanity) organized while living out of your car.
Sleeping Arrangements
I have tried just laying down the sheets and blankets, I have tried thin mats, and I have tried a platform with a mattress. All have their pros and cons and every trip was a lesson learned. I have a small to mid-size SUV, and just laying down blankets gave me the least amount of storage with the most amount of room to move around inside of the vehicle. I would recommend a sleeping pad to make it more comfortable on the joints and to help if your back seats don't lay down flat. This option is the best for weekend trips and can be an easy set up and take down. The next option was a platform with a thin mat. I had much more storage, but most most of my ability to be inside of my car for anything other than sleeping. For longer trips, having the extra storage was absolutely necessary, but the sleeping arrangement was not comfortable to be stayed for more than a few days. The last thing I tried was with the platform and a 6 inch mattress. Six inches might have been overkill, but it also doubles as a small sofa that I can use in my home. This was the most comfortable sleep I had, and I had more than enough storage to fit all of the gear I needed for three weeks on the road with day hiking and backpacking gear.
One of the biggest problems that I ran into that made trying to figure out my sleeping arrangements was that I didn't want to be confined to a small portion of my car and wanted to be able to move around with ease at night if I got restless. If I would suggest something differently, it would be to a sleeping pad that only took up the space that laying the smaller of the back seats would take, and using the other half for storage. It's also imporant to understand the temperature dynamics of being in a car through the night. Your car will mirror the temperature of the outside, and if there is a significant enough temperature difference between day and night you will wake up in the middle of the night a couple of times to add a layer. I recommend a thin, light blanket that you would normally use during the day or evening at home, a thicker warm blanket, a heavy quilt, and a sleeping bag. Sleeping bags are an awesome layer, especially if you own the kind that unzips to become a blanket, but they're a noisy and uncomfortable material compared to normal blankets. I used it as a middle layer between the quilt and the thin blanket and honestly slept fantastic in sub-freezing temperatures. I also chose to bring a pillow from home to make sure I slept my best.
To add a little privacy and block out annoying lights (including the moon sometimes), there are a few different ways to block windows. For your front windshield, a standard car sunshade is recommended and will help prevent your car from heating up too quickly in the morning. For the passenger doors, you can buy screens, cut up king size pillowcases and fit them over your windows, use posterboard, or make sunshades out of the same reflective mylar that the front window is made of. I used king sizes pillowcases which made it easy to have a half sunscreen to still allow a breeze and prevent bugs while keeping it dark inside. I was too lazy to do this for both sets of windows, and used a towel strung across a bungee cord to separate the front from the back sheets which worked just as well.
To Cook or Not to Cook?
There's a big difference between cooking at a campsite and cooking in your kitchen. You don't have all the prep space and the numerous pots, pans, and utensils. You're also very limited by how long your food can stay cool, how hard it is to reheat things, how many cooking supplies you have, and most importantly, how easy things are to clean. But with a little creativity and some basic gear, you can whip up some pretty tasty meals.
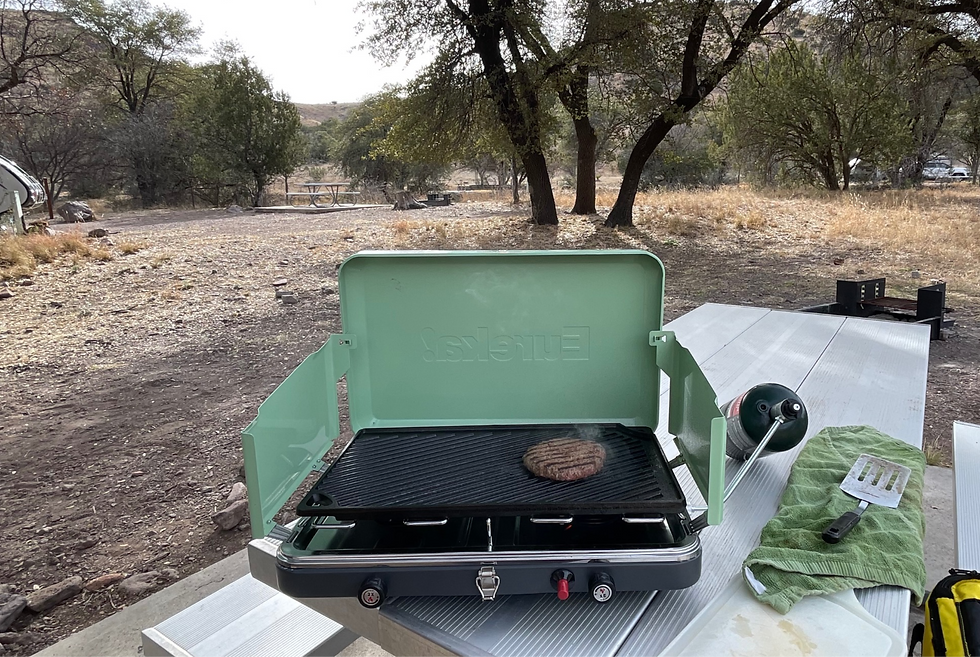
So what do you need to make a good meal? I used my Eureka two-burner stove and a cast iron griddle to make almost all my meals. For coffee and hot water, I used my JetBoil. I did have a small pot and pan that I brought just in case but never used. Other items I brought that I did use were my cutting board, knife, and spatula. And of course, my bowl, eating utensils, and coffee cup.
For breakfast, just about every standard breakfast item is easy to make. I went with fried eggs, potatoes, and sausage for the first week of my trip. The second week was all about pancakes. The Kodiak brand pancakes can be cooked without eggs making them a great mix for a camping trip. I brought along peanut butter, syrup, and some single-serve jelly packets to top my pancakes. Let me be the first to tell you that pancakes cooked in bacon grease, covered in peanut butter and strawberry jelly is an amazing breakfast. The last week was all about the oats. If you enjoy oats at home, it is super easy to pack the toppings. If you plan on eating oats for longer than a few days, buying new packs of toppings might be in your best interest.
Lunch and dinner are where it gets a little trickier. I learned a few different tips and tricks that make cooking for one easier. Try to use ingredients in multiple different meals if possible. This tip applies extra well if you want to buy ingredients that need to stay cold but can only keep them cold for as long as it takes your cooler to warm up. For me, this was good when I bought bacon. I used half of the bacon for breakfast, and the other half to make chicken bacon ranch pizzas. I cheated with this meal a little because I did prep and cook the chicken at home. I could have cooked the chicken on my camp stove, but I didn't want to deal with prepping raw meat and I don't trust my cooking skills that much. Pizzas are a great easy option and there's no shortage of toppings that you can pick up. I used the personal pizza dough packs that are about 6 inches and only require a couple of minutes of cooking. Pro tip? Save all of the single-serve sauce packets you get from restaurants. These single-serve packets don't need to be refrigerated, have a long shelf life, and are easy to pack. The next most obvious meal I had was hot dogs. I don't think this needs any more detail, but they will always be a good go-to item. I had to get creative after that. I wanted to make chicken fajitas, but I actually couldn't find plain chicken near Zion or Bryce National Parks. Instead, I picked up cheese, tortillas, a bratwurst or similar meat (I can't seem to remember now) and a delicious barbecue sauce. This ended up being a super easy meal to cook and insanely delicious. The BBQ sauce was a local blend picked up near Bryce Canyon. It's very easy to go after the brand names that you recognize from home, but I always recommend trying a local version if you can. I picked up some local soaps in Escalante that smell fantastic, leave my skin smelling just as good, and have lasted me a little over three months. Honestly, I don't know how I ever used commercial-brand soaps.
Regardless of what you choose to cook, always bring at least salt and pepper and any seasonings that you use regularly. The biggest tip that I can share is to always have a backup meal plan. The first few days of my trip I was trapped in my car by 30-50 mph winds which made it impossible to light and sustain a flame. And honestly that weather wasn't that fun to be out in anyways, let alone to cook in.
Keeping it Fresh and Clean
Staying clean while on a road trip and living in your car requires some strategic planning, but it's entirely manageable with a few key practices. When choosing what clothes to bring on the road, you need to bring easy to wash clothes that don't require any special care or maintenance. If you're visiting a location that supports this type of clothing, opt for moisture-wicking and quick-dry fabrics that can be easily washed in a sink or with a portable washboard and air-dried overnight. Consider using a laundry bag or at least a separate bag to store dirty clothes until you have the chance to wash them. And make sure that bag is big enough for the amount of clothes you anticipate accumulating at any one time. If you end up having to store them separately, there's a good change you might foget some when you do go to wash clothes.
Clothes aren't the only thing you need to worry about keeping clean. When you're eating, driving, sleeping, and getting in and out of your car, it's easy to accumulate a small mess. When it comes to keeping your car clean, organization is crucial. Use storage bins or bags to keep items sorted and off the floor. A small handheld vacuum or a dustpan and brush can help keep dirt and crumbs at bay, while disinfecting wipes are great for quick cleanups of surfaces. At least once a week, make an effort to take everything out of your car and air it out just a little. This will also help repack and reorganize so you can count if you've lost anything or if you are running low on supplies. When it comes to vaccuming out or dusting out the vehicle, that is going to depend on the area that you are in and what your shoes and vehicle are accumulating. At a minimum, once a week when you pull everything out of your vehicle. Prefarably, a quick dust and vaccum every 3-4 days will help prevent you from feeling grubby.
Keeping dishes and utensils clean can be easily managed with a small, portable dishwashing station. Biodegradable soap, a scrub brush, and a couple of microfiber towels are all you need. Most campgrounds have running water, even if they lack a full kitchen or dishwashing area. And more often than not, even campgrounds without a shower will have a dishwashing area. Simply fill a basin with water to wash your dishes, rinse them with clean water, and allow them to air dry. When you're in a campground please use the facilities provided. When you're in a more remote area, dillution is the solution to pollution. Dispose of any water at least 200 feet away from water sources, and a best practice is to sling the water in a wide arc so that is isn't disposed of in a concentrated location. Also, don't be afraid to boil some hot water and pour it on or in your dishes and let it set for a while.
When it comes to keeping yourself clean, campgrounds often provide basic facilities, such as restrooms with running water. Restrooms with a shower are even harder to come by. Solar powered showers are an easy way to get warm water, but you run into an issue that most campgrounds don't offer the privacy to take a shower. Additionally, if you choose to go this route you need to use only a small amount of biodegrable soap. A better rinse off is to use extra large body wipes. These often contain aloe and are a great way to refresh your skin and feel like a million bucks after a day out and about. There are also face wipes that will do in a quick pinch each night. And, just because you're on the road, doesn't mean that you can forget about your teeth. Brush and floss each morning and night to keep your breath fresh and your mouth clean.
Organization
When your car is your home, staying organized is key. Otherwise, it’s a slippery slope from “everything in its place” to “where did I put my phone… again?” This was a particular issue for me each morning because I never did figure out the best way to set stuff for sleeping. Use bins, baskets, and bags to compartmentalize your gear. Using bags inside bins can also help. There's multiple organization strategies you can use, and I find that a combination of all can sometimes make the most sense. Keep frequently used items (like snacks and chargers) within easy reach, and stow less urgent stuff (like extra blankets or emergency gear) in the hardest to reach places. I kept my food and drinks in the backseat, the clothing in the right half of the trunk, and the rest of the gear in a bin on the left side. I kept my backpacks and hiking supplies, which I used every day, in the passenger seat. It may seem the best to have a sleeping situation that is easy to pack up and upack, but I find that having to re-set up sleeping arrangements is the least enjoyable part of the trip, and the biggest reason to switch to car camping over tent camping. However, it is important to embrace the art of the “car shuffle.” There isn't a lot of room and there will never be a perfect way to pack items because every trip requires different items with different levels of use and need.
In Summary?
Car camping is full of unexpected challenges and unforgettable moments. Whether you’re cooking up a campfire feast, doing laundry in a bucket, or trying to stay clean with nothing but wet wipes, the key is to embrace the chaos and roll with it. Hopefully, these tips and stories help you on your own car camping adventure—because the road is long, but it’s a lot more fun when you’re prepared.
Comments